Cloud security cameras have transformed home monitoring from fuzzy VCR tapes to real-time alerts on your phone. Unlike traditional CCTV that requires DVRs and piles of hard drives, cloud-based systems send footage directly to remote servers, meaning you can check on your porch pirate problem from three states away. But not all cloud cameras are created equal. Storage fees, bandwidth needs, and privacy concerns can turn a simple setup into a headache. This guide walks through what cloud security cameras actually do, how to pick the right system, and what DIY installers need to know before drilling the first hole.
Table of Contents
ToggleKey Takeaways
- Cloud security camera systems upload video to remote servers, eliminating the need for DVRs and hard drives while enabling remote access from anywhere via smartphone app.
- Before installing cloud security cameras, verify your upload bandwidth (not download speed) to ensure smooth streaming, as a single 1080p camera requires 2-4 Mbps and multiple cameras can saturate slower connections.
- Choose between cloud storage (accessible anywhere but recurring fees), local storage (no monthly costs but limited capacity), or hybrid models that balance cost and reliability.
- Position cameras 8-10 feet high with a 15-30° downward tilt to capture faces clearly, and always test placement with temporary mounts before permanently drilling holes.
- Cloud security camera subscriptions add significant long-term costs; calculate annual expenses across all cameras and consider local-only storage for less critical views to manage budget.
- Address common challenges like Wi-Fi dropouts with mesh systems, false alerts through activity zones and person detection, and privacy concerns by choosing end-to-end encrypted systems or disabling audio recording.
What Are Cloud Security Camera Systems and How Do They Work?
A cloud security camera system captures video footage and uploads it to offsite servers via your home’s internet connection, rather than storing everything locally on a physical device. The camera itself contains a sensor, lens, and wireless radio (usually Wi-Fi, sometimes cellular). When motion is detected or continuous recording is enabled, the footage streams to the manufacturer’s cloud servers.
From there, you access recordings through a smartphone app or web portal. Most systems use H.264 or H.265 video compression to reduce file sizes, important because a single 1080p camera can generate 60-100 GB of data per month if recording continuously.
Cloud cameras typically require a subscription plan for extended storage. Free tiers often limit you to 24-48 hours of clips or basic motion alerts. Paid plans unlock features like 30-day rolling storage, person detection using AI, activity zones, and higher resolution downloads.
Upload bandwidth is the limiting factor for most home networks. A single 1080p camera streaming at 2-4 Mbps won’t stress most connections, but adding four or five cameras can saturate a slower DSL line (especially if someone’s streaming Netflix simultaneously). Check your upload speed, not download, since that’s what matters for cloud cameras. Most ISPs provide asymmetric speeds: 100 Mbps down but only 10 Mbps up.
Key Benefits of Choosing Cloud-Based Security Cameras for Your Home
Remote access from anywhere is the headline feature. Whether you’re at work or on vacation, you can pull up live feeds and review alerts instantly. No need to be on the same network or configure complicated port forwarding.
No DVR or NVR hardware cluttering up a closet. Traditional CCTV systems demand a dedicated recorder box with hard drives that eventually fail. Cloud systems eliminate that single point of failure, and the maintenance headaches.
Automatic software updates mean your cameras gain new features and security patches without manual firmware flashing. Most cloud platforms push updates silently in the background, keeping the system current.
AI-powered alerts have improved dramatically. Modern cloud cameras can distinguish between people, vehicles, animals, and packages. This cuts down on false alarms from swaying trees or passing cars. Some platforms even recognize familiar faces (though this raises privacy questions, more on that later).
Easy scalability: adding another camera usually means buying the unit and pairing it through the app. No rewiring a central recorder or worrying about channel limits.
Professional monitoring options are available with some cloud systems. For an extra monthly fee, a monitoring service can contact authorities if an alarm is triggered, bridging the gap between DIY security and traditional alarm systems.
The tradeoff is ongoing cost. While a professional security installation might have a higher upfront expense, cloud subscriptions add up year after year. A $10/month plan costs $120 annually, $1,200 over ten years.
Cloud Storage vs. Local Storage: Which Is Right for You?
Cloud storage uploads footage to remote servers. Pros: accessible anywhere, survives if the camera is stolen or damaged, often includes AI processing. Cons: recurring subscription fees, requires reliable internet, potential privacy concerns about third parties holding your data.
Local storage saves footage to a microSD card in the camera or a base station with internal storage. Pros: no monthly fees, data stays on your property, works even if internet drops. Cons: limited capacity (typically 32-256 GB), footage is lost if the device is stolen, no remote access without additional configuration.
Many newer systems offer hybrid models: continuous recording to local storage with cloud backup for motion-triggered clips. This balances cost and reliability. Ring and Arlo both support this approach on certain models.
Bandwidth considerations matter more than most homeowners expect. Uploading 24/7 can quickly hit data caps on satellite or fixed-wireless internet. For rural homes with limited connectivity, local storage with selective cloud uploads makes more sense. Urban homes with fiber or cable typically have enough headroom for full cloud operation.
Retention periods vary wildly. According to comparisons of major storage plans, Nest offers 60 days at the high end while others cap at 14-30 days. If you’re away for extended periods, check how long footage persists before auto-deletion.
Backup redundancy: cloud storage protects against local hardware failure, but what if the service goes down or the company folds? Download critical clips periodically or maintain a local backup for truly important footage.
Essential Features to Look for in a Cloud Security Camera
Resolution: 1080p (1920×1080) is the baseline. 2K and 4K cameras provide sharper detail for identifying faces or license plates, but they also demand more bandwidth and storage. For most entry points and driveways, 1080p suffices if the camera is positioned within 15-20 feet of the area you’re monitoring.
Field of view (FOV): Wide-angle lenses (120-160°) cover more area but can distort edges. A 110-130° FOV balances coverage and clarity. Pan-tilt-zoom (PTZ) models let you adjust remotely, but they cost more and introduce moving parts that can fail.
Night vision: Look for infrared (IR) LEDs with a range of at least 25 feet. Color night vision, using a built-in spotlight or ambient light amplification, helps identify details that monochrome IR misses, but it drains more power and can annoy neighbors.
Two-way audio: useful for talking to delivery drivers or warning off intruders. Check if the speaker is loud enough, many budget cameras have tinny output that’s barely audible outdoors.
Motion detection zones: The ability to mask out busy streets or trees prevents alert fatigue. AI-based person detection further reduces false positives. Some cameras charge extra for this through subscription tiers.
Weather resistance: Outdoor cameras need an IP65 rating or higher to handle rain and dust. IP66 or IP67 provides extra protection against heavy storms. Check the operating temperature range if you’re in a climate with harsh winters (some cameras fail below 0°F).
Power source: Battery-powered cameras offer flexible placement but require recharging every 2-6 months depending on activity. Wired cameras (using PoE or standard AC adapters) eliminate battery anxiety but limit placement. Solar panel add-ons can extend battery life indefinitely if the camera gets a few hours of direct sun daily.
Integration: If you’re already invested in a smart home ecosystem (Alexa, Google Home, Apple HomeKit), pick cameras that integrate natively. This allows voice commands and automation (e.g., turning on lights when motion is detected).
Installation Tips for DIY Homeowners
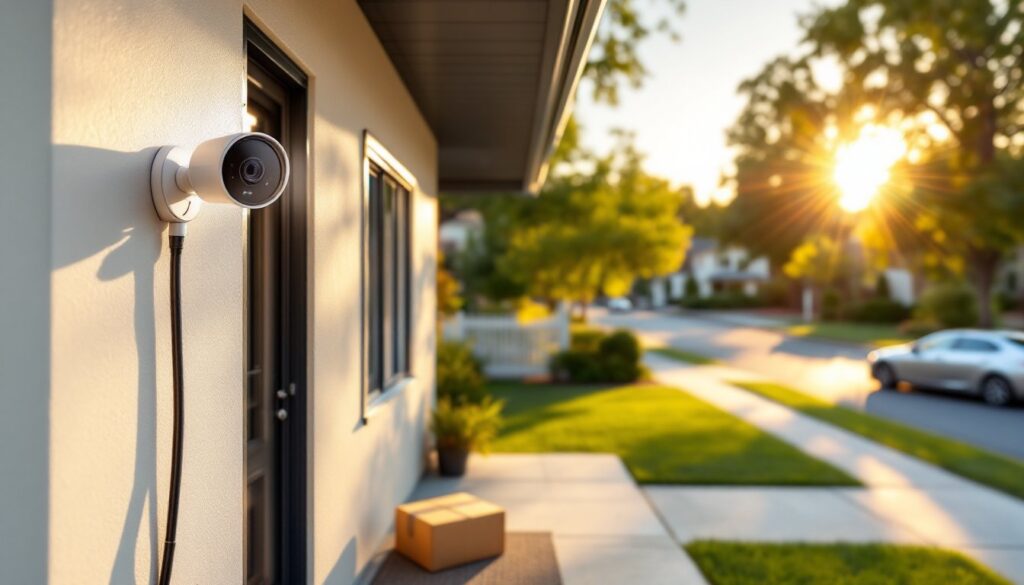
Mount height matters: Position cameras 8-10 feet off the ground, high enough to avoid tampering but low enough to capture faces clearly. Tilting down at a 15-30° angle provides the best facial recognition.
Avoid backlighting: Don’t aim cameras directly at bright windows or the setting sun. The sensor will compensate by darkening everything else, turning people into silhouettes. Position cameras so the light source is behind or beside the lens.
Wi-Fi signal strength: Before drilling, check signal at the mounting location using your phone. Cameras need at least 2-3 bars for reliable streaming. If signal is weak, add a Wi-Fi extender or mesh node. 2.4 GHz bands reach farther than 5 GHz but are slower, most cameras default to 2.4 GHz for this reason.
Weatherproof cable routing: For wired cameras, use exterior-rated Ethernet cable (Cat5e or Cat6) and seal entry points with silicone caulk. Avoid sharp bends that can damage conductors. If running cable through walls, check for studs and existing wiring. Drill through the rim joist or soffit rather than siding when possible, it’s easier to seal and less visible.
Power considerations: AC-powered cameras need an outdoor outlet or through-wall wiring. If adding a new outlet, you may need a permit and should follow NEC Article 210 for outdoor receptacles (GFCI protection required). Battery cameras skip this but need a ladder for periodic charging unless you add solar panels.
Test before permanent mounting: Use temporary mounts or painter’s tape to position the camera and verify the view covers what you need. Adjust height and angle, then check the app to confirm motion zones and night vision coverage. Only drill permanent holes once you’ve confirmed placement.
Tools you’ll need: drill/driver, masonry bits if mounting to brick or stucco, level, pencil, ladder (ensure it’s on stable ground, someone should hold the base), wire fish tape for running cables, and caulk gun. Safety gear: gloves and goggles, especially when drilling overhead.
Common Challenges and How to Overcome Them
Wi-Fi dropouts: Cameras furthest from the router often experience intermittent disconnects. Solutions include adding a mesh Wi-Fi system (which creates a unified network), using powerline Ethernet adapters to bridge weak spots, or switching to PoE cameras with wired backhaul. Smart home platforms like those featured on CNET often recommend mesh systems for multi-camera setups.
Subscription fatigue: Multiple cameras can mean multiple subscriptions. Some brands charge per camera: others offer flat-rate plans for unlimited cameras. Calculate total annual cost before committing. If budget is tight, prioritize cloud storage for front and back entry points and use local-only storage for less critical views.
Privacy concerns: Cloud footage is accessible to the manufacturer under most terms of service, sometimes handed to law enforcement without a warrant. If this bothers you, stick with systems that support end-to-end encryption or local-only storage. Disable audio recording if you want to avoid capturing conversations. Be mindful of neighbors’ properties in your camera’s view, pointing a camera at someone else’s windows or yard can lead to disputes or legal issues.
False alerts: Motion detection can trigger dozens of alerts daily from passing cars, wind-blown branches, or insects crossing the lens at night. Use activity zones to exclude irrelevant areas. Enable person/vehicle detection if your subscription includes it. Lower motion sensitivity slightly if you’re getting phantom triggers (especially at night when IR can pick up bugs).
Limited upload bandwidth: Homeowners with DSL or satellite connections may find that multiple cameras saturate their upstream. Solutions: reduce recording resolution to 720p, set cameras to upload clips only when motion is detected rather than continuous recording, or schedule uploads during off-peak hours if your system supports it. Understanding home monitoring setups can help you design systems that match your bandwidth.
Battery drain in cold weather: Lithium batteries lose capacity in freezing temps. If you’re running battery cameras in winter climates, expect to recharge more frequently or add solar panels. Alternatively, choose wired cameras for year-round reliability.
Firmware bugs: Cloud cameras occasionally suffer from buggy updates that break features or cause crashes. Keep an eye on user forums and reviews on sites like Digital Trends before updating firmware, or enable auto-updates only after a version has been out for a week or two.
Stolen cameras: Battery cameras mounted within reach can be grabbed. Use anti-theft mounts (which require tools to remove) or position cameras out of easy reach. Remember, cloud storage ensures footage survives even if the camera is stolen, one advantage over purely local systems.
Conclusion
Cloud security cameras deliver flexible, accessible home monitoring without the hassle of DVRs or complex wiring. They’re not perfect, subscriptions add up, internet dependency is real, and privacy questions linger, but for most homeowners, the convenience outweighs the drawbacks. Focus on bandwidth, choose cameras with the features you’ll actually use, and don’t skip the test-mounting phase. With a little planning, you’ll have a system that works reliably and fits your budget.