Traditional security cameras go blind at night, or worse, they switch to grainy black-and-white footage that turns every intruder into an unidentifiable shadow. Color night vision technology changes that equation entirely. These cameras capture full-color video in near-darkness, delivering clear details like clothing color, vehicle make, and facial features that matter when it counts. For homeowners serious about property protection, understanding how these systems work and where they excel isn’t optional anymore, it’s essential.
Table of Contents
ToggleKey Takeaways
- Color night vision security cameras capture full-color video in low-light conditions using large-aperture lenses, starlight sensors, and specialized image processors—delivering identifiable details like clothing color and vehicle make that traditional infrared cameras miss.
- Choose color night vision cameras for areas with ambient lighting (front doors, driveways, entry points) and infrared systems for dark, unlit zones (barns, back fields) to optimize coverage and cost-effectiveness.
- Essential features to prioritize include 4K resolution for digital zoom capability, 0.01 lux or lower minimum illumination ratings, 110-130° field of view, and IP65+ weatherproofing for reliable outdoor performance.
- Mount color night vision cameras within 15-25 feet of existing light sources at 7-9 feet height for optimal facial recognition, avoiding backlighting and positioning to overlap coverage zones by 15-20%.
- Proper installation through cable management, sealed penetrations, quality anchors, and mobile app configuration before finalizing mounts ensures your color night vision security system delivers actionable intelligence for law enforcement and insurance claims.
What Is Color Night Vision Technology and How Does It Work?
Color night vision cameras use ambient light amplification and specialized image sensors to capture full-color video in low-light conditions. Unlike traditional infrared systems that strip out color information, these cameras combine several technologies to maintain true color reproduction after sunset.
Most color night vision systems rely on one of three approaches:
- Large-aperture lenses (f/1.0 to f/1.6) that gather more available light from streetlamps, porch lights, and moonlight
- Starlight sensors with enhanced light sensitivity, often rated at 0.001 lux or lower
- Integrated warm LED spotlights that illuminate the scene with white light instead of infrared
The key component is the image sensor. High-end models use back-illuminated CMOS sensors with larger pixel sizes (typically 2.0 to 3.0 microns) that capture more photons per pixel. This increased light-gathering capability allows the camera to produce color images in conditions where your naked eye struggles to see.
Some systems combine these approaches, using ambient light amplification as the primary method and switching on warm LEDs only when light levels drop below a certain threshold (usually around 0.01 lux). This hybrid approach balances power consumption with image quality.
The processing pipeline matters too. Advanced image signal processors (ISPs) apply multi-frame noise reduction and dynamic range optimization to clean up low-light footage without introducing the color artifacts that plague cheaper cameras.
Key Benefits of Color Night Vision for Home Security
Color information dramatically improves suspect identification. A 4K camera with color night vision can capture details like a blue jacket, red vehicle, or distinctive hair color, details that disappear completely in infrared footage.
Forensic value increases substantially. Law enforcement can use color details to match suspects to witness descriptions or separate multiple individuals in a scene. That red backpack or yellow bike becomes identifiable evidence instead of a gray blob.
False alarm reduction improves with color detection. Many modern systems use AI-powered object recognition that works better with color data. The camera can distinguish between a person, a pet, and windblown vegetation more accurately when it has full spectral information.
Nighttime situational awareness gets better for homeowners actively monitoring their property. Seeing a delivery person’s brown uniform or recognizing a neighbor’s car in real-time provides context that monochrome footage simply can’t deliver.
The technology also helps with vehicle identification. License plates are easier to read, but equally important is the ability to identify vehicle color, body style, and distinguishing features like bumper stickers or damage, information that makes police reports substantially more useful.
Color Night Vision vs. Traditional Infrared: Which Is Better for Your Home?
Traditional infrared (IR) cameras illuminate scenes with 850nm or 940nm IR LEDs invisible to the human eye. They’re reliable, power-efficient, and work in complete darkness. But they produce monochrome footage and can create the “spotlight effect” where the center of the frame is overexposed while edges remain dark.
Color night vision cameras need some ambient light, typically from streetlights, porch fixtures, or moonlight. In truly pitch-black environments (think rural properties with no external lighting), they’ll struggle or switch to a less effective infrared mode.
Here’s the practical breakdown:
Choose infrared cameras when:
- Covering large, unlit areas like barns, back fields, or detached garages with no nearby light sources
- Budget constraints require choosing between camera quantity and advanced features
- Power consumption matters (battery-powered systems in remote locations)
- Covert surveillance is necessary (IR LEDs don’t create visible light)
Choose color night vision when:
- Monitoring areas with ambient lighting (front yards, driveways, entryways)
- Capturing identifiable details is the priority over general motion detection
- The property has existing landscape or security lighting
- Integration with smart home lighting is possible
Hybrid approach: Many homeowners install color night vision at main entry points (front door, driveway, side gates) where lighting exists, and use IR cameras for darker perimeter zones. This maximizes the benefits of both technologies without overspending on lighting infrastructure.
Another consideration is wildlife interference. Deer, raccoons, and moths are attracted to white LED spotlights but generally ignore IR illumination. If pest control companies working in home security installations note frequent animal activity, traditional IR may cause fewer false triggers.
Essential Features to Look for in a Color Night Vision Camera
Resolution: Don’t settle for less than 1080p (1920×1080), but 4K (3840×2160) provides substantially better digital zoom capability. When reviewing footage, you’ll often need to zoom into faces or license plates, higher resolution preserves detail during playback.
Sensor specs: Look for minimum illumination ratings of 0.01 lux or lower for starlight performance. Marketing claims vary wildly, so check third-party reviews from sources like CNET for real-world low-light performance testing.
Field of view: Most residential installations benefit from 110° to 130° horizontal FOV. Wider isn’t always better, ultra-wide lenses (150°+) introduce barrel distortion that makes facial recognition harder. Match FOV to mounting height and coverage area.
Smart lighting modes: Premium models offer adaptive spotlights that activate only when motion is detected, preserving battery life while ensuring color capture when it matters. Look for adjustable sensitivity and scheduling so you’re not illuminating the yard every time a cat passes through.
Storage options: Cameras offering both local storage (microSD up to 256GB or 512GB) and cloud backup provide redundancy. Local storage eliminates subscription fees but requires physical access: cloud storage survives camera theft but comes with ongoing costs.
Weather rating: Outdoor cameras need IP65 or higher weatherproofing. IP66 or IP67 offers better protection against pressure washing and severe storms. Check the operating temperature range, some cameras fail below 0°F or above 120°F.
Power delivery: Choose between:
- PoE (Power over Ethernet): Single-cable installation, most reliable for always-on monitoring
- Battery-powered: Easiest installation but requires recharging every 2-6 months depending on activity
- Wired 12V: Stable power but requires running low-voltage wiring
Integration compatibility: If you’re running Home Assistant, SmartThings, or Alexa/Google smart home ecosystems, verify ONVIF compliance or native integration before purchasing. Not all cameras play nicely with all platforms.
Best Placement Strategies for Maximum Color Night Vision Performance
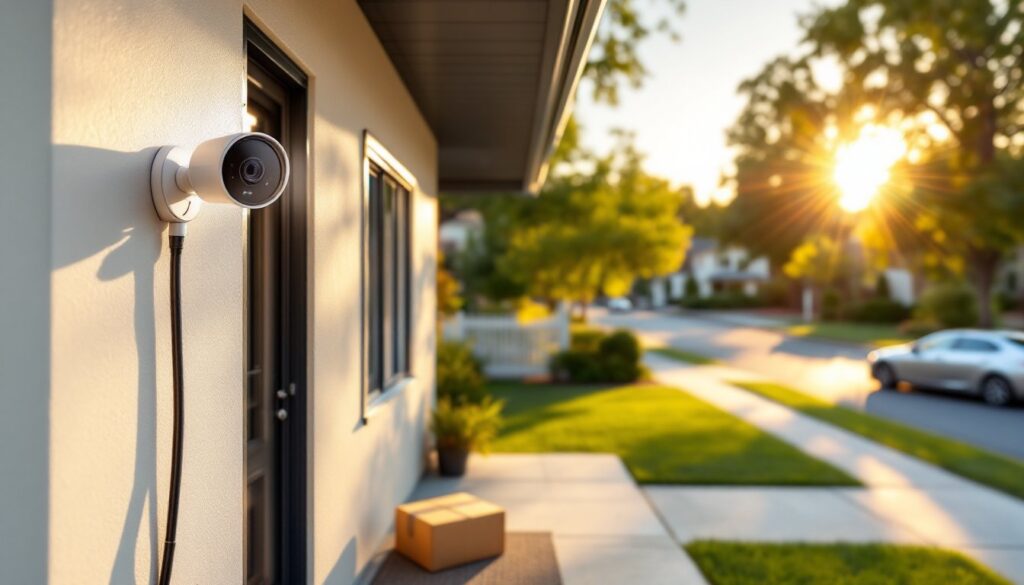
Leverage existing light sources. Mount cameras within 15-25 feet of porch lights, motion-activated floods, or streetlamps. Color night vision performance drops exponentially with distance from light sources, a camera 40 feet from the nearest light will deliver substantially worse results than one 15 feet away.
Avoid backlighting. Don’t position cameras where they’re pointed directly at bright light sources. A camera facing a streetlight will expose for the bright area, turning everything else into silhouettes. Instead, place cameras so light sources illuminate the subject area from the side or behind the camera.
Standard height for facial capture: Mount cameras at 7-9 feet for optimal facial recognition. This height captures faces at a natural angle while remaining difficult to tamper with. Mounting too high (12+ feet) creates a downward angle that shows the tops of heads but obscures faces.
Overlap coverage zones. Position cameras so their fields of view overlap by 15-20%. This eliminates blind spots and provides multiple angles of the same event, crucial for establishing timelines and corroborating details.
Mind the approach angles. For driveways, mount cameras to capture vehicle fronts (license plates) rather than just sides or rears. A camera positioned at the property entrance pointing inward catches arrivals head-on: a second camera at the garage pointing outward catches departures.
Consider smart lighting coordination. Technologies reviewed by Digital Trends increasingly link color night vision cameras with smart floodlights. When the camera detects motion, it triggers supplemental lighting for a few seconds, capturing color footage while also acting as a deterrent.
Account for seasonal changes. That camera with perfect lighting in summer might struggle in winter when trees are bare and shadows shift. Walk your property at night during different seasons before finalizing camera positions.
Avoid glare zones. Windows, glossy siding, and wet surfaces create reflections that confuse camera sensors. Position cameras at angles that minimize reflective surfaces in the frame, or use polarizing filters if your camera system supports them.
Installation Tips for DIY Homeowners
Test before you drill. Use painter’s tape and temporary mounting to position the camera and check the view on your phone. Spend time at night verifying that ambient light levels actually support color mode, many homeowners discover they need to adjust lighting or camera positions.
Run cable through walls properly. For wired installations, use CL2 or CL3 rated cable (in-wall fire safety rating). Never run low-voltage and line-voltage (120V AC) cables through the same stud bay without proper separation, most electrical codes require 6-inch minimum separation.
Seal penetrations thoroughly. Any hole you drill through exterior walls needs weatherproofing. Use silicone caulk (not acrylic latex) around cable entry points. For professional appearance, install low-voltage wall plates on both interior and exterior sides of penetrations.
Account for cable management. Budget an extra 3-4 feet of cable at the camera end for service loops, this slack allows you to unmount and service the camera without disconnecting cables. Secure cables every 12-18 inches with cable clips rated for outdoor use.
Mind your Wi-Fi signal. Battery-powered color cameras consume substantial bandwidth uploading high-res color footage. If mounting farther than 40-50 feet from your router, consider a Wi-Fi 6 mesh extender with dedicated backhaul, or switch to wired PoE cameras entirely.
Use proper anchors. Mounting to vinyl siding? Use stainless steel lag screws into the underlying studs, not just siding. For brick or stucco, use Tapcon concrete screws with pilot holes drilled using a carbide masonry bit. Under-sizing anchors is a common failure point when wind or vandalism tests the installation.
Set up monitoring access before finalizing mounts. Configure mobile apps, verify cloud connectivity, and test alert notifications while the camera is still accessible at ground level. Troubleshooting network issues from a 10-foot ladder is nobody’s idea of fun.
Label everything. Use a label maker to tag cables at both ends (“Front Door Cam,” “Driveway Cam East”). Six months from now when you’re adding another camera, you’ll thank yourself.
Safety reminder: Always wear safety glasses when drilling overhead, and use a fiberglass ladder when working near electrical service lines. Color night vision cameras typically draw under 10 watts, but it’s still good practice to verify power before handling wired connections.
Conclusion
Color night vision transforms home security from simple motion detection into actionable intelligence. The technology delivers clear, identifiable footage that actually helps law enforcement and insurance claims, making the modest premium over traditional infrared well worth it for most residential applications. Focus on proper placement near existing light sources, and don’t skimp on installation quality. The camera’s only as good as its view and its mount.