Setting up a home security system doesn’t require a PhD in electrical engineering or a month’s salary paid to installers. A 4 camera security system strikes the right balance between coverage and complexity, enough cameras to monitor critical zones without drowning in footage or blowing your budget. Whether you’re protecting a single-family home or deterring porch pirates, four strategically placed cameras cover most residential properties effectively. This guide walks through what makes four cameras the practical choice, what features matter, where to mount them, and how to install the system yourself without calling in pros.
Table of Contents
ToggleKey Takeaways
- A 4 camera security system provides optimal coverage of critical entry points (front, back, and sides) while managing storage costs and bandwidth without requiring professional installation, making it the practical choice for most homeowners.
- Proper camera placement at 8–9 feet high with overlapping coverage ensures no blind spots and deters vandalism, while features like 1080p resolution, infrared night vision, and motion detection maximize effectiveness and reduce false alerts.
- Wired PoE systems offer reliable set-it-and-forget-it performance, while wireless options provide faster installation for renters or seasonal setups, with each trade-off depending on your home’s layout and technical comfort level.
- Strategic mounting near entry points—front door angled down 15–30°, back door on the approach path, and side gates covering driveways—captures facial details and vehicle identification without backlighting issues.
- DIY installation of a 4 camera security system saves $200–$500 on professional fees and requires only basic tools, proper cable routing, and 48 hours of testing before final seal-up.
Why 4 Cameras Is the Sweet Spot for Home Security
Four cameras hit the Goldilocks zone for most homeowners. It’s enough to cover the essential entry points, front door, back door, and two side access areas, without creating a surveillance state or requiring a dedicated server room.
Coverage vs. cost is the first reason. A single camera leaves blind spots. Two cameras cover front and back but miss side gates or driveways. Eight cameras might sound thorough, but you’ll spend more on equipment, storage, and time reviewing footage than the average DIYer wants to commit. Four cameras typically run $300–$800 for a complete system, depending on resolution and features.
Most break-ins happen through predictable entry points: front doors (34%), back doors (22%), and first-floor windows or side access (23%), according to data from the Department of Justice. Four cameras let you monitor all these zones simultaneously. You’re not guessing where trouble might come from, you’re watching it.
Storage and bandwidth matter more than most people realize. Each camera generates 1–4 GB of footage per day at 1080p resolution. Four cameras mean 4–16 GB daily, manageable with a 1 TB hard drive or cloud plan. Scale up to eight cameras, and you’re doubling storage costs and network load. For homes with standard internet plans (100–300 Mbps), four wireless cameras won’t choke your bandwidth the way a larger array might.
Permit requirements rarely apply to security cameras since they’re low-voltage and non-structural, but check local regulations if you’re mounting on shared walls in a condo or HOA property. The installation itself is straightforward enough for a confident DIYer with basic tools.
Key Features to Look for in a 4 Camera Security System
Not all camera systems are created equal, and the cheapest option usually costs you twice, once at purchase, once in frustration. Here’s what separates a solid system from junk.
Resolution: 1080p (2MP) is the baseline for 2026. Anything lower won’t give usable detail for identifying faces or license plates beyond 15 feet. 4K (8MP) cameras offer sharper images, especially for zooming into recorded footage, but they quadruple file sizes. For most homes, 1080p or 2K (4MP) balances clarity and storage. Many home security cameras now include digital zoom features that make 2K a practical middle ground.
Night vision: Look for infrared (IR) LEDs with at least 65–100 feet of range. Color night vision is a newer feature that uses ambient light or built-in spotlights to capture full-color footage in low light, useful for identifying clothing or vehicle colors, but it requires more power and costs more upfront.
Field of view (FOV): Cameras with 90–110° FOV cover standard doorways and driveways. Wider angles (130°+) can monitor larger areas but may introduce fisheye distortion at the edges. Match the FOV to the space, narrow for hallways, wider for yards.
Motion detection and alerts: Smart motion detection filters out trees swaying or car headlights and focuses on people or vehicles. Cheaper systems trigger on any pixel change, flooding your phone with false alerts. Look for systems with customizable detection zones so you’re not alerted every time a neighbor walks their dog past your property line.
Weather resistance: Outdoor cameras need an IP65 rating or higher. IP65 means dust-tight and protected against water jets, enough for rain and snow. IP67 adds submersion protection, overkill unless you’re mounting below a gutter downspout.
Storage options: Local storage (DVR/NVR with a hard drive) means no monthly fees and full control of footage. Cloud storage offers remote access and automatic backups but typically costs $5–$15/month per camera. Hybrid systems that support both give you flexibility. Independent testing from CNET suggests local storage remains more reliable in rural areas with inconsistent internet.
Best Placement Strategy for Your 4 Cameras
Where you mount cameras matters more than which cameras you buy. Poor placement creates blind spots, glare, and useless footage. Here’s how to cover a typical home with four cameras.
Front and Back Entry Points
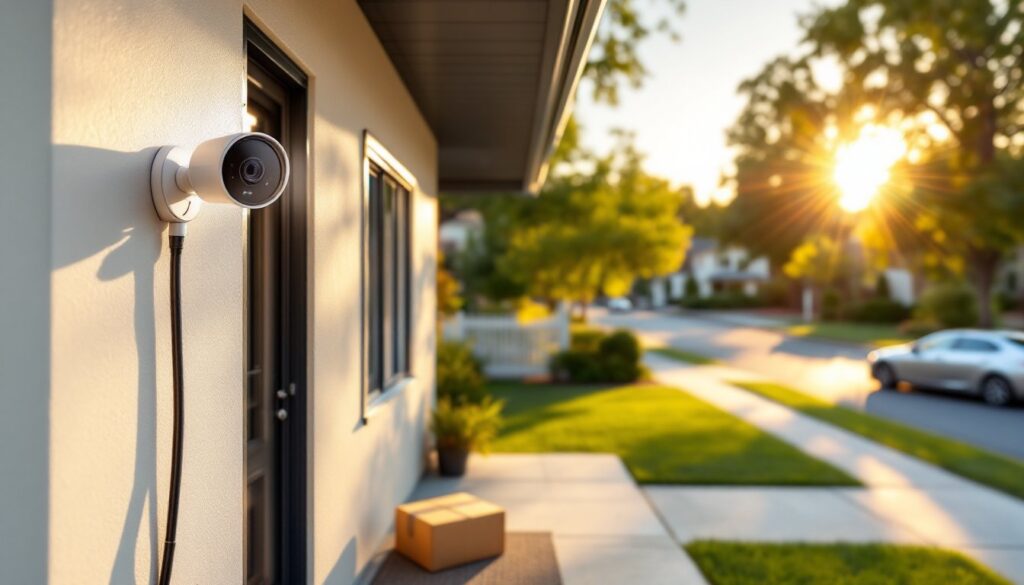
Front door camera is non-negotiable. Mount it 7–9 feet high, angled down at 15–30° to capture faces without hat brims blocking the view. Position it opposite the door if possible, not directly above, overhead mounting gives you the top of someone’s head, not their face. If your porch has a roof overhang, mount under the soffit to protect the camera from weather while keeping the lens clear.
Avoid backlighting. If the camera looks toward a bright street or sunset, faces turn into silhouettes. Use a camera with wide dynamic range (WDR) or mount at an angle that keeps bright light sources out of frame. Installing a reliable CCTV for home coverage often means testing angles before permanently mounting.
Back door or patio camera should cover sliding glass doors, French doors, or any ground-level rear exit. Mount it 8–10 feet high on the house exterior or under an eave, angled to see the door and a few feet of the approach path. Burglars often scope backyards first since they’re less visible from the street. Make sure the camera overlaps slightly with your side cameras to eliminate dead zones.
Wire routing: If you’re running coax (BNC) or Ethernet, drill through the exterior wall near the camera location using a 7/8-inch bit and a slight downward angle to prevent water infiltration. Use silicone caulk around the entry point. For wireless cameras, ensure the router signal reaches each location, exterior brick or stucco walls can cut WiFi range in half.
Side Access and Garage Coverage
Side gates and driveways are how intruders move between front and back without being seen. Mount a camera on the garage corner or house side wall, aimed down the driveway or along the fence line. This camera should capture anyone walking from the street to your backyard.
Garage cameras can cover garage doors, side entry doors, and vehicles. If your garage has windows, mount the camera high enough that it’s not easily reached or obstructed by a parked car. For detached garages, consider a wireless camera if trenching cable across the yard isn’t practical.
Height matters for deterrence: Cameras below 7 feet are easy to vandalize or spray-paint. Above 10 feet, you’ll need a ladder for maintenance and may sacrifice detail. The 8–9 foot range is the sweet spot. Use camera systems supported by experienced home security system installers if running cable through attics or crawl spaces feels beyond your skill level.
Overlap coverage: Don’t aim cameras straight out into open space. Angle them slightly toward each other so a person moving between zones appears in at least two camera feeds. This confirms direction of travel and reduces the chance someone slips through a gap.
Wired vs. Wireless 4 Camera Systems: Which to Choose
This choice impacts installation difficulty, reliability, and ongoing maintenance. Neither option is universally better, it depends on your home and skill level.
Wired systems (PoE or coax) deliver consistent power and data over Ethernet (Cat5e/Cat6) or coaxial cable. PoE (Power over Ethernet) is the modern standard: a single cable per camera carries both power and video to a central NVR. Cameras don’t need nearby outlets, and there’s no battery to replace or WiFi dropout to troubleshoot. Video quality stays stable regardless of network traffic.
Installation requires fishing cable through walls or attics, doable with a fish tape and patience, but count on a full weekend for four cameras if you’re new to it. You’ll need a PoE switch or NVR that supplies power to the cameras (typically 15.4W per port for standard PoE, or 802.3af). Budget $150–$300 for a 4-channel PoE NVR with a 1–2 TB hard drive.
Coax systems (analog HD or HD-CVI) are older but still sold. They use BNC connectors and separate power cables, which means twice as much wire to run. Unless you’re upgrading an existing coax system, PoE is the better choice.
Wireless systems communicate over 2.4 GHz or 5 GHz WiFi and typically run on rechargeable batteries or plug into outdoor outlets. Installation is faster: mount the camera, sync it to the base station or app, and you’re recording. No drilling through studs or crawling through attics.
The tradeoffs: battery life averages 2–6 months depending on motion frequency and temperature. Cold weather cuts battery capacity. You’ll be climbing a ladder every few months to swap or recharge batteries. WiFi cameras also depend on signal strength, exterior walls, metal siding, and distance degrade connection quality. If your router is in the basement and the camera is on a second-floor eave 60 feet away, expect dropouts. Many systems from Good Housekeeping product tests recommend a WiFi extender for properties over 2,000 square feet.
Bandwidth usage can be an issue. Four cameras streaming 1080p at 15–20 fps consume 2–4 Mbps each, totaling 8–16 Mbps continuously. If someone is gaming or streaming 4K video indoors, camera feeds may lag or drop.
Verdict: Choose wired PoE if you want set-it-and-forget-it reliability and don’t mind the installation effort. Choose wireless if you’re renting, can’t run cable, or want to move cameras seasonally. Hybrid systems that support both wired and wireless cameras exist, giving flexibility to wire high-traffic cameras and go wireless for hard-to-reach spots.
DIY Installation Tips for Homeowners
Installing a 4 camera system yourself is within reach if you’re comfortable with a drill and basic hand tools. Here’s how to avoid the common pitfalls.
Plan before you drill. Sketch your property and mark camera positions. Walk the perimeter and confirm each camera has clear line of sight to the area you want to monitor. Use painter’s tape to mark mounting spots, then view the location from the camera’s perspective, what looks good from the ground may be blocked by a tree branch or gutter at camera height.
Tools and materials you’ll need:
- Cordless drill with masonry bits (for brick/stucco) or wood bits (for siding)
- Fish tape or pull wire for running cable through walls
- Ladder rated for your weight plus 50 lbs (Type I minimum)
- Silicone caulk (clear or color-matched to siding)
- Cable clips or conduit to secure exterior cable runs
- Voltage tester or PoE tester to confirm power delivery before mounting cameras
Safety first: Wear safety glasses when drilling overhead. Use a stable ladder on level ground, never lean a ladder against vinyl siding or gutters. If you’re working on a roof or above the second story, consider hiring professional home security system installers instead.
Mounting: Most cameras come with a mounting template. Hold it level (use a bubble level or smartphone app), mark screw holes, drill pilot holes, and insert anchors if you’re drilling into masonry or fiber cement. For wood siding or studs, 1.5-inch wood screws work fine. Don’t overtighten, stripped threads mean starting over.
Cable routing: Keep low-voltage cable (PoE or coax) at least 12 inches away from AC wiring to avoid interference. Use outdoor-rated Cat6 or coax even for interior runs that might be exposed to moisture later. Drip loops (a small sag in the cable before it enters the wall) prevent water from running down the cable into the house.
NVR or DVR setup: Place the recorder near your router and power outlet. Connect cameras to the NVR via PoE switch or directly into PoE NVR ports. Power up the system and follow the on-screen setup, most systems auto-detect cameras. Set recording schedules (continuous, motion-only, or scheduled), adjust motion zones, and test mobile app access before calling it done.
Test for at least 48 hours before sealing up cable entry points. Walk through each camera’s field of view at different times of day. Check night vision clarity, motion alerts, and recording playback. Adjust angles if needed, it’s easier to tweak now than after caulking everything shut.
Permit and code notes: Low-voltage camera installation typically doesn’t require permits, but verify with your local building department if you’re unsure. If you’re adding new outdoor outlets for wireless camera power, that’s standard electrical work, follow NEC guidelines and use GFCI-protected outlets.
DIY installation saves $200–$500 compared to professional installation, and you’ll know your system inside and out for future adjustments or troubleshooting.