Picking a home security system shouldn’t feel like decoding a technical manual. You want reliable protection, straightforward installation, and tech that actually works when you need it, not a subscription nightmare or a drawer full of dead sensors. Consumer Reports has done the heavy lifting, putting systems through rigorous testing to see which ones deliver on their promises. Whether you’re protecting a rental, a suburban house, or a multi-story property, understanding what the experts prioritize can save you time, money, and the frustration of dealing with false alarms at 2 a.m.
Table of Contents
ToggleKey Takeaways
- Consumer Reports evaluates home security systems based on ease of installation, sensor reliability, app performance, customer support, and overall value—so focus on these factors rather than marketing claims.
- SimpliSafe, Ring Alarm Pro, and Abode are top-rated home security system options, each excelling in different areas: DIY installation, smart home integration, and local storage respectively.
- Professional monitoring ($15-$60/month) reduces false alarm fines and dispatches authorities automatically, while DIY systems save upfront costs but require you to respond to alerts personally.
- Proper sensor placement is critical: mount door/window sensors on clean surfaces, position motion detectors in corners 6-7 feet high away from windows and vents, and position outdoor cameras 8-10 feet high to capture face-level detail.
- A typical three-bedroom home requires 1 base station, 8-12 door/window sensors, 2-3 motion detectors, 1-2 cameras, and optional glass break sensors—budget $200-$500 initially plus monthly monitoring costs.
- Test your Wi-Fi signal strength before installation (target -70 dBm or better) and verify that door/window sensor magnets are within 1 inch when closed for reliable performance.
What Consumer Reports Evaluates in Home Security Systems
Consumer Reports doesn’t just read spec sheets, they test systems in real-world scenarios. Their evaluation criteria focus on ease of installation, sensor reliability, app performance, customer support response times, and overall value for the subscription cost.
Installation complexity gets measured by how long it takes an average user to set up the base station, sync sensors, and connect to Wi-Fi. Systems that require drilling, fishing wires, or configuring routers get flagged if instructions aren’t crystal clear.
Sensor performance is tested under varying conditions: temperature swings, interference from other wireless devices, and placement at different distances from the hub. Motion detectors are evaluated for false alarm rates, cheap PIR (passive infrared) sensors often trigger on pets, sunlight, or HVAC vents.
App functionality matters more than most manufacturers admit. Testers check notification speed (how fast alerts reach your phone), live video latency, and whether the interface makes sense when you’re half-awake and checking a motion alert. Systems with clunky apps or delayed notifications rank lower, even if the hardware is solid.
Customer support quality is assessed through mystery shopping: how long it takes to reach a human, whether techs can troubleshoot beyond scripted responses, and if monitoring centers dispatch help appropriately. Many homeowners comparing smart home protection options underestimate how critical responsive support becomes during an actual event.
Top-Rated Home Security Systems from Consumer Reports Testing
Based on 2025-2026 testing cycles, several systems consistently earn high marks. SimpliSafe continues to score well for DIY installation and no-contract monitoring options, though its camera integration lags behind competitors. The base station uses cellular backup, which keeps the system online even if someone cuts your internet line, a feature worth the extra cost.
Ring Alarm Pro ranks high for users already invested in Amazon’s ecosystem. The built-in eero router is a bonus if you’re upgrading your network anyway. Sensor range is reliable up to 250 feet in open space, though walls and metal ductwork cut that significantly. One downside: professional monitoring requires an Amazon subscription, which bundles services you may not need.
Abode earns praise for power users who want local storage and third-party integrations without monthly fees. You can self-monitor via the app or add professional monitoring month-to-month. The system supports Z-Wave and Zigbee devices, making it a strong choice if you’re building a broader smart home setup.
CNET’s testing of these systems aligns with Consumer Reports findings on reliability and user experience. Vivint scores high for professional installation and premium hardware but requires a long-term contract, which some homeowners find restrictive. If you prefer a system tailored to your layout with pro-grade sensors, the upfront investment and monitoring fees may be worth it, especially for larger properties where DIY sensor placement gets tricky.
For those considering regional options, solutions like Telus Smart Home offer integrated monitoring and support, though availability is limited by service area.
Professional Monitoring vs. DIY Installation: Which Wins?
The choice hinges on three factors: upfront cost, technical comfort, and whether you’re home often enough to respond to alerts yourself.
DIY systems cost less initially, typically $200-$500 for a starter kit, and monthly monitoring is optional. You control placement, can relocate sensors when you move, and aren’t locked into multi-year contracts. The tradeoff: you’re responsible for troubleshooting connectivity issues, replacing batteries, and responding to alerts. If you’re out of cell range on a hiking trip when a sensor triggers, nobody’s calling the fire department.
Professional monitoring adds $15-$60/month depending on the service tier, but trained operators verify alarms before dispatching authorities. This reduces false alarm fines (many jurisdictions charge $50-$150 per false police dispatch after the first few). Installation by a licensed tech ensures sensors are placed correctly, motion detectors angled to cover entryways, glass break sensors positioned within range of windows, and control panels mounted at code-compliant heights.
Professional systems often include cellular backup and battery backup as standard. DIY kits may charge extra for these, and budget models sometimes skip them entirely. If your power goes out during a storm, you want the system still armed and communicating.
Smart Home Integration and Camera Quality
Camera specs matter more than megapixel counts suggest. A 1080p camera with good low-light performance and a wide dynamic range outperforms a 4K camera with poor software and slow processing. Look for cameras with night vision range of at least 20 feet, two-way audio (so you can tell the delivery driver to leave the package), and local or cloud storage options.
Tom’s Guide testing highlights that systems with HomeKit Secure Video, Google Home, or Alexa integration perform best when you already use those ecosystems. Cross-platform compatibility is improving, but expect hiccups if you’re mixing a Ring doorbell with a SimpliSafe system and Google Nest speakers.
Camera placement requires planning. Exterior cameras should be mounted 8-10 feet high to avoid tampering but still capture face-level detail. Angle them to cover entry points, not just wide lawn views. Interior cameras work well in main hallways or common areas but respect privacy, avoid bedrooms and bathrooms for both legal and ethical reasons.
For homeowners weighing camera-heavy setups, CCTV for home installations may offer better recording capacity and wired reliability compared to wireless security camera bundles.
How to Choose the Right System for Your Home
Start by mapping your entry points: doors, ground-floor windows, garage access, and any basement egress points. The International Residential Code (IRC) requires egress windows in bedrooms, and those are common break-in points since they’re often hidden from street view.
Count how many sensors you need. A basic three-bedroom, two-bath house typically requires:
- 1 base station (placed centrally for best wireless range)
- 8-12 door/window sensors (one per exterior door, at least one per accessible window)
- 2-3 motion detectors (covering main hallways and common areas)
- 1-2 cameras (front door and back yard or garage)
- 1 glass break sensor per large window grouping (optional but useful for sliding doors)
- Smoke and CO detectors if not already integrated with monitoring
Check if your local jurisdiction requires permits for alarm systems. Some cities mandate registration and charge annual fees ($25-$75/year). Failing to register can result in fines or refusal of police response after repeated false alarms.
Wireless vs. hardwired matters for installation complexity. Wireless systems use Z-Wave, Zigbee, or proprietary RF frequencies in the 300-900 MHz range. They’re easier to install but can suffer interference from cordless phones, baby monitors, and thick walls. Hardwired systems require running 18-22 AWG wire through walls and attics, more labor-intensive but more reliable in large homes or properties with metal framing.
If you rent, stick with DIY wireless systems. Drilling into door frames or fishing wires through walls will cost you the security deposit. Adhesive-mounted sensors and battery-powered cameras are your friends here. Good Housekeeping’s reviews emphasize renter-friendly systems that don’t require permanent modifications.
Budget for the total cost of ownership: hardware, monthly monitoring, battery replacements (most sensors use CR123A or AA batteries lasting 1-3 years), and potential upgrade costs as sensors age out of support.
Installation Tips for DIY Home Security Systems
Before you drill anything, map your Wi-Fi coverage. Security systems need reliable connectivity, and the base station is usually the bottleneck. Use your phone’s Wi-Fi analyzer app to check signal strength in the proposed location. If you’re seeing less than -70 dBm, you’ll have connectivity issues. Add a mesh router node or reposition your main router first.
Mount the base station at least 4 feet off the ground in a central location, ideally near your router but not in a basement where cellular backup signals struggle. Avoid placing it near metal ductwork, in closets with dense shelving, or next to microwaves and cordless phone bases.
Door and window sensors should be mounted with the magnet and sensor within 1 inch of each other when closed. Clean both surfaces with isopropyl alcohol before applying adhesive strips, dust and oils kill sticking power. For heavy doors or high-traffic areas, use the included screws instead of adhesive. Pre-drill pilot holes with a 1/16-inch bit to avoid splitting trim.
Motion detectors work best mounted in corners 6-7 feet high, angled downward to cover the room. Don’t aim them at windows (sunlight causes false triggers), HVAC vents (moving air and heat), or directly at front doors where temperature changes from opening the door can set them off. If you have pets, enable pet immunity settings and keep detectors above pet height, most systems can ignore animals under 40-80 pounds depending on the model.
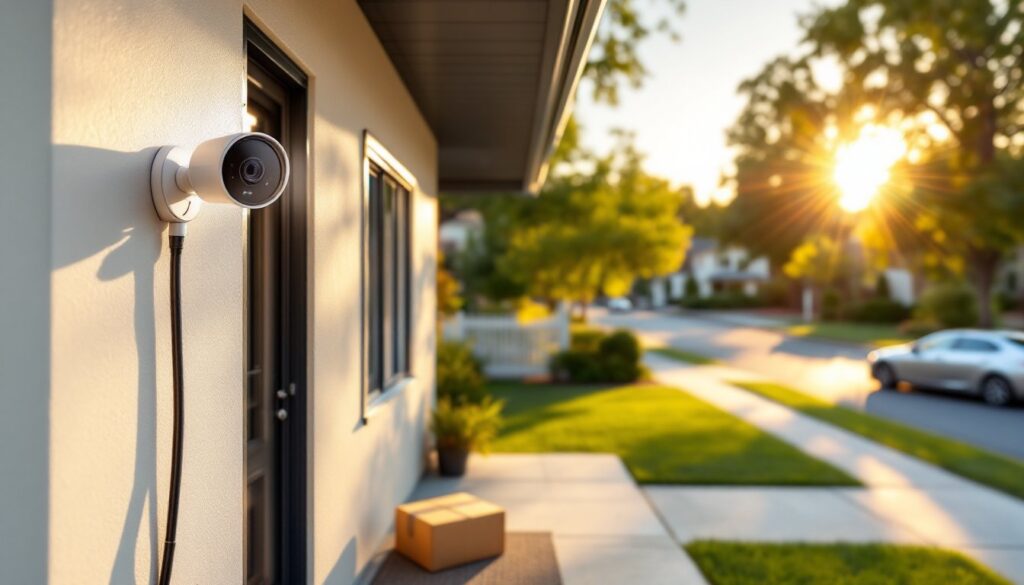
Outdoor cameras need weatherproof mounting. Use the provided weatherproof cable glands and seal any drilled holes with silicone caulk to prevent water intrusion. Run power cables through walls if possible rather than surface-mounting them where they’re visible and vulnerable to tampering. If drilling through exterior walls, angle the hole slightly downward to prevent water from wicking inside.
Test everything before finalizing placement. Walk through your home with sensors armed and trigger each one individually. Check notification speed and verify the app correctly identifies which sensor triggered. If response time is sluggish, troubleshoot your network before blaming the system.
Wear safety glasses when drilling into walls, you never know what’s behind drywall. Use a stud finder with wire detection to avoid puncturing electrical wiring or plumbing. If mounting exterior cameras on vinyl siding, use stainless steel screws into the structural sheathing, not just the siding itself.
For homeowners in high-risk areas exploring comprehensive setups, Essential Home Security strategies extend beyond just alarm systems to layered deterrence approaches.
Conclusion
Consumer Reports testing strips away marketing hype and shows which systems actually perform when it matters. Whether you choose DIY flexibility or professional installation depends on your budget, technical comfort, and how much peace of mind you’re willing to pay for monthly. Measure twice, test thoroughly, and remember that the best system is the one you’ll actually arm every time you leave the house.