Eight cameras might sound like overkill, until you map your property and realize how many blind spots exist. Driveways, side gates, backyard corners, garage entries, and front porches all demand coverage if you’re serious about security. An 8-camera system fills those gaps without very costly or requiring a security operations center in your basement.
This guide walks through strategic placement, essential features, installation best practices, and realistic cost expectations. Whether you’re protecting a sprawling suburban lot or a multi-story home with multiple access points, eight cameras offer the coverage most homeowners need without redundant overlap.
Table of Contents
ToggleKey Takeaways
- Eight cameras provide optimal coverage for most residential homes between 2,000–4,000 square feet, eliminating blind spots without excessive redundancy or high costs.
- Strategic placement at entry points (front door, driveway, garage) and perimeter areas (backyard, side gates, rear door) ensures comprehensive security without privacy violations.
- Power over Ethernet (PoE) camera systems are the most reliable and practical choice for DIY installation, requiring only a single cable per camera for both power and data.
- Invest in cameras with at least 1080p resolution for entry points and driveways, IP66/IP67 weather rating for outdoor durability, and customizable motion detection to minimize false alerts.
- A quality 8-camera security system costs $400–$1,200 for hardware, plus $50–$150 for DIY installation supplies, with virtually no ongoing fees when using local NVR storage instead of cloud services.
- Proper cable management, soffit mounting, and sealed penetrations prevent water damage and equipment failure, while professional installation ($500–$1,200) offers an alternative for homeowners lacking tools or time.
Why 8 Cameras Is the Sweet Spot for Home Security
Four cameras leave gaps. Sixteen cameras mean you’re watching footage of your lawn for hours. Eight cameras strike the balance for typical residential properties ranging from 2,000 to 4,000 square feet with standard yard dimensions.
Most homes have six to eight critical zones: front door, driveway, garage, backyard, side gates (often two), and rear door. An 8-camera setup covers these zones with one or two cameras to spare for high-risk areas like detached sheds or pool equipment.
Network video recorders (NVRs) in 8-camera kits typically include pre-configured ports and enough storage capacity, usually 2TB to 4TB, to handle a week or more of continuous recording at 1080p resolution. Scaling up to 16 channels later often requires replacing the entire NVR, making eight a practical stopping point unless you’re securing a compound.
Building codes don’t regulate camera quantity, but some HOAs restrict visible outdoor equipment. Check covenants before mounting cameras on street-facing facades.
Strategic Camera Placement for Complete Coverage
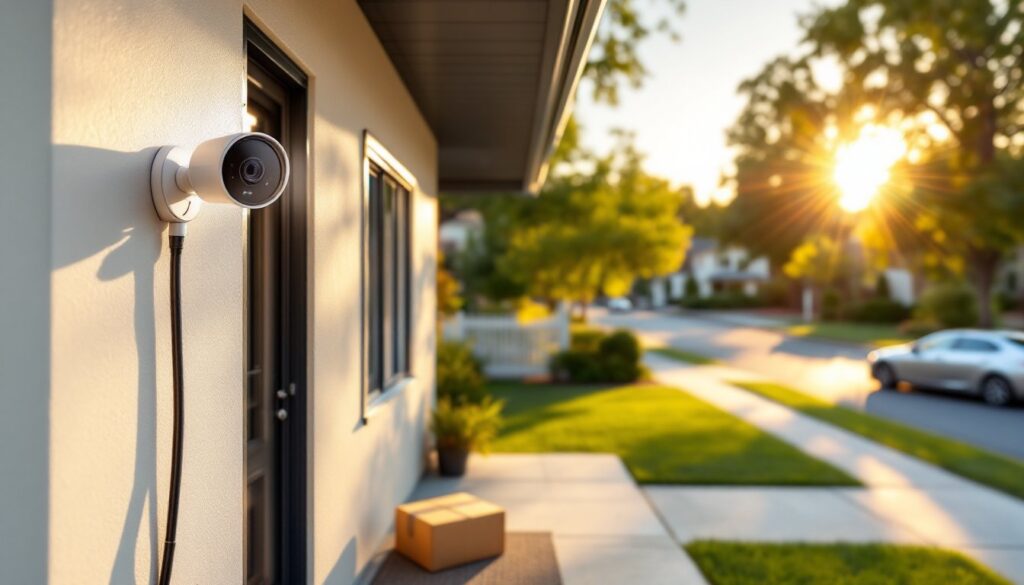
Start with entry points. Mount one camera at the front door at 7-9 feet, angled down to capture faces, not just the tops of heads. A second camera should cover the driveway and street approach, positioned to catch vehicle license plates and pedestrian traffic.
The garage demands two angles if it’s detached or has a side service door. One camera monitors the main door: another covers the approach path. For attached garages, one camera facing the driveway often suffices.
Backyards need at least two cameras: one on the rear door and one wide-angle unit covering the yard perimeter and fence line. Corner-mounted cameras reduce blind spots created bydecks, patios, or landscaping.
Side gates are common breach points. Even narrow passages warrant a camera if they connect front and back yards. Thieves use these routes to access rear windows undetected.
The final camera(s) should address property-specific risks: pool areas, detached workshops, RV parking pads, or basement walk-outs. Avoid aiming cameras directly at neighbors’ windows or yards, privacy disputes kill goodwill fast.
For homes requiring professional installation assistance, certified installers assess sightlines and wiring paths during initial consultations. Power over Ethernet (PoE) cameras simplify placement since a single cable delivers both power and data, but running Cat5e or Cat6 through walls may require fishing tools and patience.
Top Features to Look for in 8 Camera Security Systems
Resolution matters. 1080p is the baseline: 4K cameras provide license plate clarity and facial detail at greater distances but consume four times the storage. For driveways and street-facing cameras, 4K pays off. For side gates and backyard corners, 1080p is adequate.
Night vision comes in two flavors: infrared (IR) and color night vision. IR cameras produce black-and-white footage in total darkness up to 100 feet. Color night vision uses ambient light or built-in spotlights to maintain color accuracy, useful for identifying vehicle colors or clothing but less effective in pitch-black conditions.
Motion detection should include customizable zones. You don’t want alerts every time a branch sways or a car passes on the street. Quality systems let you mask zones and adjust sensitivity per camera.
Weather resistance is non-negotiable for outdoor cameras. Look for an IP66 or IP67 rating, which ensures protection against dust and heavy rain. Cameras rated lower than IP65 won’t survive a Midwest winter or Gulf Coast summer.
Local vs. cloud storage: NVR-based systems store footage on hard drives you control, avoiding monthly cloud fees. Cloud storage offers off-site redundancy if someone steals your NVR, but expect $10-$30/month for 8 cameras. Hybrid systems support both.
Many modern CCTV setups now integrate smart detection features that distinguish between people, vehicles, and animals, reducing false alerts caused by stray cats or delivery trucks.
Two-way audio is standard on higher-end models, enabling real-time communication through the camera. It’s useful for directing delivery drivers or deterring prowlers, but microphone quality varies, test before relying on it.
According to reviews on Digital Trends, integration with smart home platforms like Alexa, Google Home, or Apple HomeKit adds convenience but isn’t essential for security functionality.
Best 8 Camera Security Systems for DIY Installation
PoE systems dominate the DIY market for good reason. A single Ethernet cable per camera handles power and data, eliminating the need to mount cameras near outlets. Kits typically include an 8-channel NVR, cameras, cables (usually 60 or 100 feet each), and mounting hardware.
Look for systems with plug-and-play NVR setup, cameras auto-detect when connected, and the NVR assigns IP addresses without manual network configuration. Brands that require subnet adjustments or static IP assignments frustrate beginners.
Reorlux and Amcrest offer solid mid-tier PoE kits with 4MP or 5MP cameras, 2TB NVRs, and mobile apps that don’t require monthly fees. Expect to pay $400-$700 for complete 8-camera kits.
High-end options from Hikvision or Lorex push $1,000+ but include 4K cameras, larger hard drives (4TB+), and advanced analytics like line-crossing detection or intrusion zones. These features reduce false alerts by ignoring motion outside defined boundaries.
Wireless systems exist but aren’t truly wireless, they still need power. Running eight power adapters to outdoor locations often proves harder than pulling Ethernet cables. Battery-powered cameras like those from Ring or Arlo work for temporary monitoring but aren’t practical for whole-home, always-on surveillance. Battery life tanks in cold weather, and you’ll spend more time swapping batteries than reviewing footage.
For those comparing camera installation methods, hardwired PoE systems deliver the most reliable performance with the least ongoing maintenance.
Installation Tips and Common Mistakes to Avoid
Measure cable runs before buying. Most kits include 60-foot cables, which sound generous until you route them through attics, down walls, and across soffits. Add 20% to your estimated length, cables don’t run in straight lines.
Soffit mounting beats wall mounting for weather protection. Eaves shield camera housings from direct rain and sun, extending lifespan. Use stainless steel hardware in coastal or high-humidity areas: standard screws rust out in two years.
Don’t skimp on wall anchors. Cameras weigh 1-2 pounds, and leverage from wind or impact multiplies forces on mounting screws. Tapcons or toggle bolts are mandatory for brick, stucco, or hollow siding. Pilot holes prevent cracking.
Running cables through walls requires fish tape or rods and access to attic or crawl spaces. For two-story homes, routing cables inside exterior walls from attic to ground-floor cameras is cleaner than external conduit but takes patience. ½-inch PVC conduit works for exposed runs along fences or under eaves, paint it to match trim.
Seal penetrations. Every hole drilled through siding or soffit needs exterior-grade silicone caulk to prevent water infiltration and pest entry. Unsealed camera cables invite wasps, mice, and rot.
Power over Ethernet eliminates voltage drop concerns, but Cat5e or Cat6 cable is mandatory, Cat5 won’t reliably handle gigabit data over 100 feet. Terminate connections with proper RJ45 crimps or keystone jacks: sloppy terminations cause packet loss and camera dropouts.
Test each camera before final mounting. Connect all eight cameras, verify live feeds, adjust angles, and confirm night vision activates. Discovering a dead camera after sealing it in a soffit wastes hours.
Safety basics: Wear impact-resistant safety glasses when drilling overhead. Use a sturdy ladder with a standoff to avoid crushing cables against siding. If drilling into brick or concrete, a rotary hammer drill beats a standard drill by miles. Dust masks protect lungs from masonry dust.
Homeowners considering professional installers often weigh the $500-$1,200 installation cost against the time and tool investment required for DIY routes.
Cost Breakdown: What to Expect When Investing in 8 Cameras
System hardware: Budget $400-$1,200 for an 8-camera PoE kit depending on resolution and brand. Entry-level 1080p kits start around $400. 4K systems with 4TB NVRs and advanced analytics push $1,000+.
Installation supplies add $50-$150 if you’re DIYing: drill bits, silicone, extra cable, conduit, and mounting hardware. Professional installation ranges from $500 to $1,200 depending on property complexity and cable routing difficulty.
Ongoing costs: PoE systems have zero monthly fees if you rely on local NVR storage. Cloud backup subscriptions run $10-$30/month for 8 cameras with 30-day retention. Hard drive replacements every 3-5 years cost $60-$150 depending on capacity.
Electricity: Eight PoE cameras draw roughly 60-100 watts combined, about $7-$12/month at average US rates. Not enough to notice on your bill.
Permit fees are rare for camera installation since it’s non-structural work, but some municipalities require permits for low-voltage wiring. Call your local building department before pulling cables through walls.
Total first-year cost for a quality DIY installation: $450-$1,350. Professional installation bumps that to $1,000-$2,400. Annual costs after year one drop to nearly zero for local storage systems.
Systems like AT&T’s monitored security bundle cameras with professional monitoring for $40-$60/month but lock you into contracts and proprietary equipment.
According to pricing data compiled by CNET, homeowners who install their own systems recoup costs in avoided monitoring fees within 12-18 months compared to professionally monitored alternatives. Regional variations apply, coastal markets and areas with higher labor costs skew installation quotes upward.
Conclusion
Eight cameras cover what matters without turning your home into a surveillance compound. Focus on entry points, weak perimeters, and high-value areas. Invest in PoE infrastructure for reliability, skip gimmicks like facial recognition unless you’ll actually use them, and don’t cheap out on weatherproofing or cable quality. Whether you’re researching systems for a specific market or tackling installation yourself, proper planning beats expensive equipment every time.