Wide-angle security cameras have changed the math on property surveillance. Instead of mounting three or four separate cameras to cover a porch or driveway, a single 180 degree security camera can handle the job, fewer mounting holes, less cable to run, and fewer points of failure. These cameras use either ultra-wide single lenses or dual-sensor arrays to capture a panoramic field of view, eliminating blind spots along walls, entryways, and property lines. They’re not perfect for every application, but when positioned correctly, they offer practical coverage that rivals multi-camera setups at a fraction of the complexity.
Table of Contents
ToggleKey Takeaways
- A single 180 degree security camera can replace two to three traditional cameras while reducing installation complexity, cable runs, and potential points of failure.
- 180 degree security cameras eliminate blind spots along walls and entryways by using either ultra-wide single lenses with digital dewarping or dual-sensor arrays that stitch together panoramic views.
- Choose 2K resolution minimum (4K preferred) to maintain usable detail across the wide field of view, as 1080p appears pixelated when stretched across 180 degrees.
- Mount your 180 degree camera 8–10 feet high, centered on entry points or long walls, angled downward 15–20 degrees to capture faces and activity without wasting coverage on sky or foreground.
- Tune motion detection zones within the first setup session to reduce false alerts from passing traffic, trees, and neighboring activity by 70% or more by focusing zones on your actual property boundaries.
- Trade-offs include reduced facial recognition and license plate capture at distance compared to traditional zoomed cameras, plus higher power consumption due to increased processing requirements.
What Is a 180 Degree Security Camera and How Does It Work?
A 180 degree security camera captures a half-circle field of view, typically mounted against a wall or soffit to monitor everything in front of it. Unlike standard cameras with 90–110 degree lenses, these units use one of two approaches: a single ultra-wide lens with software correction (often called fisheye dewarping) or a dual-sensor design that stitches two narrower views into one seamless panorama.
Single-lens fisheye models use extreme wide-angle optics, think 180° or even 190°, and then apply digital dewarping algorithms to straighten the curved image into a usable flat view. The trade-off is edge distortion and slightly lower effective resolution at the far corners, since pixels are stretched during correction.
Dual-sensor designs, like Amazon’s recent Blink Arc with its dual-camera panoramic setup, mount two separate image sensors side by side in one housing, each covering roughly 90–100 degrees. The camera’s processor stitches the two feeds together in real time, producing a flatter, more natural-looking image with less distortion. You’ll pay more for this architecture, but the image quality holds up better across the entire frame.
Both types require more processing power than standard cameras, so expect higher power draw if you’re using PoE (Power over Ethernet) or battery packs. Most units output 2K to 4K resolution to maintain usable detail after digital zoom, 1080p stretched across 180 degrees looks pixelated fast.
Why Choose a 180 Degree Camera Over Traditional Models?
The main advantage is coverage efficiency. A single 180 degree camera mounted above a garage door or along a back wall can replace two or three narrower units, which means fewer cable runs, fewer mounting brackets, and a cleaner installation overall. For DIYers, that’s less drilling, less patching, and fewer potential leak points in siding or stucco.
Blind spot reduction is another practical benefit. Traditional cameras leave gaps between their fields of view, especially in corners or along long walls. A 180 degree unit mounted at the midpoint of a wall sees everything from corner to corner without dead zones, helpful for monitoring porches, driveways, or side yards where intruders can slip between camera angles.
There are trade-offs. Pixel density drops as you stretch resolution across a wider area, so facial recognition and license plate capture suffer at distance compared to a narrower, zoomed-in camera. If you need to identify someone 40 feet away, a traditional 90 degree camera with optical zoom will outperform a wide-angle unit every time.
Motion detection zones can also be trickier to configure. Many cameras let you draw activity zones to reduce false alerts, but with 180 degrees of coverage, you’re more likely to catch passing cars, swaying trees, or neighbors mowing lawns at the edges of the frame. Expect to spend extra time tuning sensitivity and zone boundaries during setup.
Cost-wise, 180 degree cameras typically run $80–$200, depending on resolution, night vision quality, and smart features. That’s comparable to buying two mid-range traditional cameras, so the financial case hinges on installation labor savings and your specific coverage needs.
Best Locations to Install Your 180 Degree Security Camera
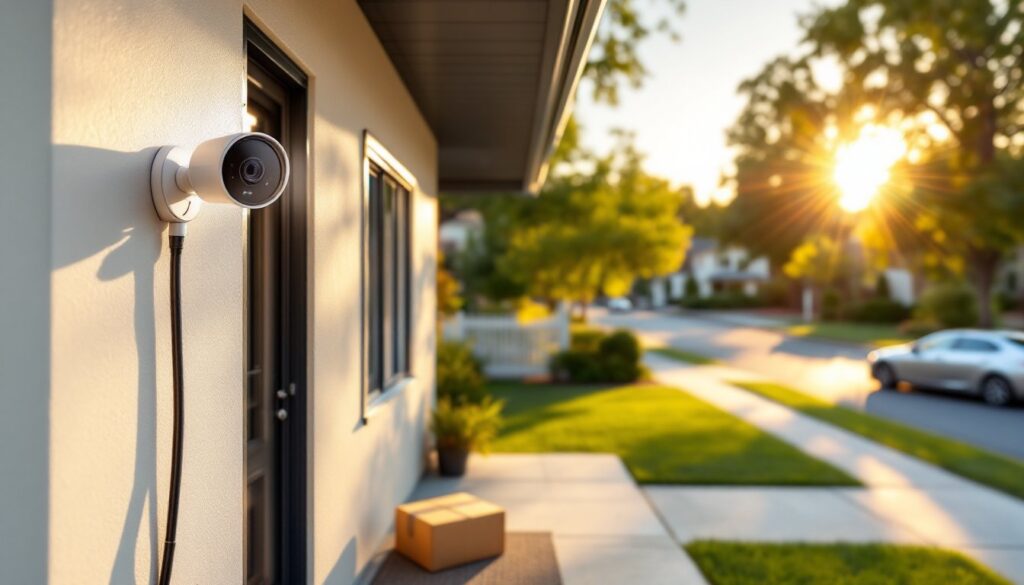
Above entry doors and garage doors is the most common placement. Mount the camera 8–10 feet high, centered on the door, angled slightly downward. This position captures visitors approaching, packages being delivered or stolen, and anyone attempting to tamper with the lock. The 180 degree spread covers the entire porch or driveway apron without needing corner cameras.
Along continuous walls or fences is where these cameras shine. If you have a long side yard, back wall, or fence line with no natural mounting point in the middle, a 180 degree camera at one end (mounted horizontally) can sweep the entire length. This works well for monitoring pool areas, garden sheds, or rear property lines where traditional cameras would require multiple units.
Under soffits and eaves provides weather protection and a clean look. Most 180 degree cameras are rated IP65 or IP66 (dust-tight, resistant to water jets), but mounting under an overhang extends lifespan and keeps the lens cleaner. Use a junction box or weatherproof mount if you’re surface-mounting to siding, this keeps water from wicking behind the camera base and into the wall cavity.
Avoid mounting at ground level or on poles unless you’re specifically monitoring a driveway gate. Low-mounted wide-angle cameras capture too much foreground (grass, pavement) and not enough useful detail at face height. They’re also easier to vandalize or redirect.
Corner installations are less ideal for 180 degree cameras, you’re wasting half the field of view pointing into the wall. Save these units for mid-wall or centered positions where the full arc is useful. For corners, a traditional 90 degree camera or a true 360 degree ceiling-mount unit makes more sense.
Key Features to Look for When Buying a 180 Degree Camera
Resolution: Go for 2K (2560×1440) minimum: 4K is better if your budget allows. Wide-angle lenses spread pixels thin, so higher native resolution gives you more usable detail when digitally zooming playback. A 1080p 180 degree camera will look soft and blocky compared to a 2K or 4K model.
Night vision type: Infrared (IR) LEDs are standard and work fine for black-and-white night footage up to 30–50 feet. Color night vision (using ambient light or a built-in spotlight) is more useful for identifying clothing, vehicle color, or other details, but it requires some existing light or drains battery faster if spotlight-equipped. Check the IR illumination range spec, 40 feet is adequate for most residential applications.
Power and connectivity: PoE (Power over Ethernet) is cleanest for new installs if you’re running cable anyway, one Cat6 line delivers power and data. Battery-powered models (like many Blink or Arlo units) are easier for retrofits but require recharging every 2–6 months depending on activity. Plug-in AC models are reliable but need an outdoor outlet nearby, which often means hiring an electrician or running extension cords (not recommended outdoors).
Storage options: Local storage (microSD card or NVR) avoids monthly subscription fees but requires physical access to retrieve footage. Cloud storage is convenient and survives camera theft, but expect $3–$10/month per camera. Some brands, like those reviewed on CNET, offer hybrid options, free local storage with optional cloud backup.
Smart integrations: If you’re already using Alexa, Google Home, or HomeKit, check compatibility. Voice commands, automated routines (“turn on porch camera when I leave”), and integration with smart locks or lights add convenience. Some cameras also support ONVIF protocol, which lets you mix brands within a single NVR system, useful if you’re building out a larger setup.
Weather rating: Look for IP65 or higher if the camera will be exposed to rain, snow, or sprinklers. The first digit (6) means dust-tight: the second (5) means water jets won’t damage it. IP66 or IP67 is better for harsh climates.
DIY Installation Tips for Homeowners
Plan your cable route first. For wired cameras, running cable through walls or soffits takes more time than the actual mounting. If you’re drilling through exterior siding into a stud bay, use a ¾-inch spade bit and angle the hole slightly downward so water doesn’t run inside. Seal the entry point with silicone caulk (not expanding foam, which can push siding out of alignment). For PoE cameras, run Cat6 cable, it’s backward compatible with Cat5e but supports higher bandwidth and longer runs (up to 328 feet).
Locate studs or solid blocking. Mounting a camera to siding alone won’t hold, especially in wind or if someone tries to yank it down. Use a stud finder to locate framing, or if you’re mounting to brick or concrete, use masonry anchors rated for at least 50 pounds. Most cameras weigh under 2 pounds, but anchors need to resist pull-out force, not just vertical load.
Mount at 8–10 feet for best results. Higher is harder to vandalize but sacrifices facial detail. Lower than 8 feet and you’re in easy reach of tampering. Angle the camera down 15–20 degrees, just enough to capture faces and activity at ground level without too much sky or foreground.
Test the view before final mounting. Power up the camera, connect it to your phone or monitor, and hold it at the intended position. Walk around the coverage area and check the live view for blind spots, glare, or unwanted motion zones (like a busy street). Adjust placement or angle as needed, then mark your drill holes.
PPE reminder: Wear safety glasses when drilling overhead (fiberglass insulation and debris will fall). Use a dust mask if cutting through stucco or masonry. Ladder safety is obvious but worth repeating, set the ladder on firm, level ground and maintain three points of contact.
Permit and code notes: Most residential security camera installations don’t require permits, but if you’re running new low-voltage wiring inside walls (not just surface-mounting), check local electrical codes. Some jurisdictions require low-voltage work to be inspected, especially in new construction or major remodels. For guidance on broader home security cameras installation best practices, many homeowners find full setup walkthroughs helpful.
Common Mistakes to Avoid with Wide-Angle Security Cameras
Mounting too high or too low. Above 12 feet, facial detail suffers, you’ll capture tops of heads, not faces. Below 7 feet, the camera is easy to disable or redirect. The 8–10 foot sweet spot balances security and image quality.
Ignoring backlighting. Mounting a camera facing a sunrise or sunset creates silhouettes, faces go dark, sky blows out. If you can’t avoid it, enable WDR (Wide Dynamic Range) or HDR mode in camera settings to balance exposure. Better yet, reposition the camera so the sun is behind it.
Skipping motion zone tuning. Out of the box, most cameras monitor the entire 180 degree field. If that includes a sidewalk, road, or neighbor’s yard, you’ll get dozens of false alerts daily. Spend 20 minutes drawing activity zones around your actual property boundaries and entry points. According to reviews on Digital Trends, well-tuned zones reduce false alerts by 70% or more.
Forgetting about lens cleaning. Wide-angle lenses are magnets for dust, pollen, cobwebs, and water spots, all of which blur the image. Every month or so, wipe the lens with a microfiber cloth and lens cleaner (or diluted isopropyl alcohol). Don’t use paper towels, they scratch plastic lenses.
Relying solely on wireless connectivity. Wi-Fi cameras are convenient until your router goes down, someone jams the signal, or a firmware update bricks the connection. For critical coverage areas (front door, driveway), consider wired cameras with local storage as a backup.
Not testing night vision range. Manufacturers often overstate IR illumination distance. Walk your property at night, check the live feed, and note where the image goes too dark to identify someone. If coverage falls short, add a motion-activated floodlight nearby, this also deters intruders and enables color night footage.
Conclusion
A 180 degree security camera simplifies coverage for long walls, entryways, and open areas where multiple traditional cameras would be overkill. The trade-off between pixel density and panoramic view is real, but for most residential applications, monitoring porches, driveways, and perimeters, the wide field wins. Mount it thoughtfully, tune the motion zones, and keep the lens clean, and you’ll get years of reliable surveillance with less hardware clutter than a multi-camera setup.